October 2, 2026
How to Restore and Colourise Old Photos With AI
The short answer
Use the Restore tool in Nano ImageEdit 2.0 Online. It has two presets: Restore damage, which removes spots, scratches and stains and improves contrast, and Colorize, which adds natural colour and fixes the faded contrast. Both change the whole photo, so compare the result with your original.
Steps
Prices and times on this page are those of Nano ImageEdit 2.0 Online on the day it was written: 50 credits ($0.50) per finished edit, usually 30 to 50 seconds, with the first edit after a quiet period taking one to two minutes longer.
A real example
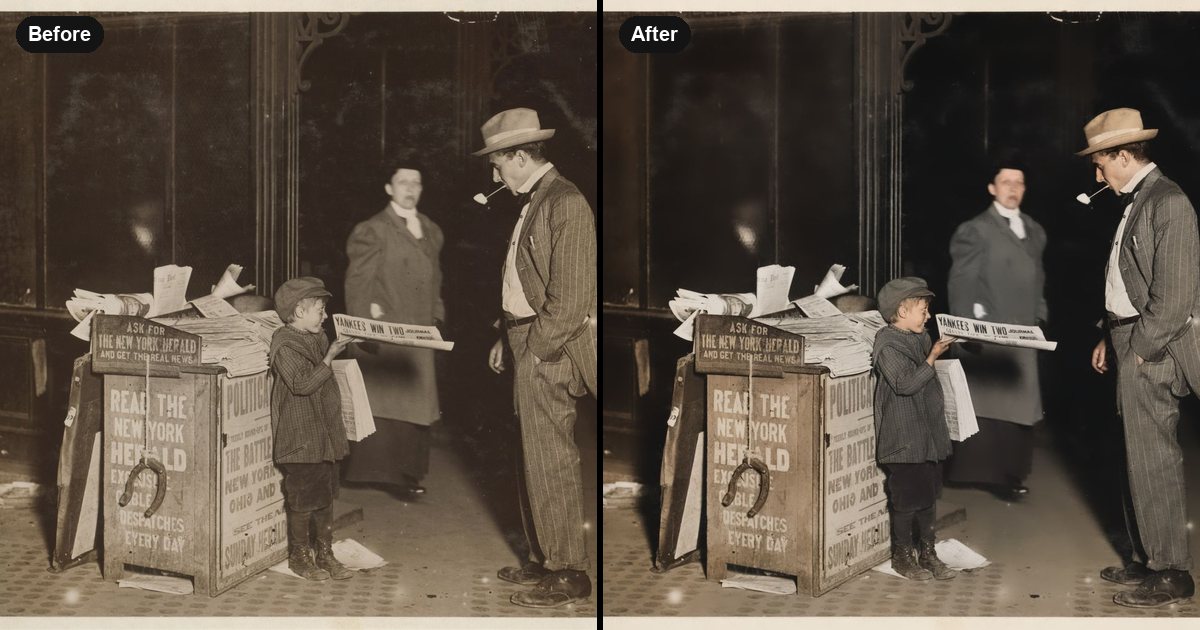
We colourised a public-domain photograph from 1910: a young newsboy at his stand, with a man, a woman and a second man standing nearby, taken at night. The instruction was "Colorize this old photograph with natural, realistic colors and fix the faded contrast."
The sepia tone became a range of colours: a tan hat, a grey striped suit, a blue-grey coat on the woman in the background, and warm wood on the newspaper stand. The composition, the people and the headline on the paper were unchanged. Because Restore changes the whole photo, it is not pixel-identical to the original the way an object edit is, and the editor does not claim it is. Use the Changes view, which shows a heat map of where new structure appeared, to see what was added.
What colourising cannot know
A black-and-white photograph does not record colour. The model chooses colours that are plausible for the scene, such as skin, wood, fabric and sky, and some of those choices will be wrong for the real day. Treat a colourised photograph as an interpretation. If a particular colour matters, such as a uniform or a flag, check it against another source before relying on it.
Tips for restoring damaged prints
Cost
50 credits ($0.50) per finished edit; refunded if it fails or you cancel.
Related guides
The photograph is "Jerald Schaitberger of 416 W. 57th St. N.Y. who helps an older boy sell papers until 10 P.M. on Columbus Circle" (Library of Congress, cph.3a01149), in the public domain.
Try it on your own photo
Nano ImageEdit 2.0 Online costs 50 credits ($0.50) per edit, and an edit that fails is refunded. New accounts get free credits.
Open Nano ImageEdit 2.0 Online